Category Archives: System Administration

Linux system administration.

Configuring CPAN.pm to use sudo to install

For security, I like to run CPAN.pm as a normal user so building & testing modules are all performed as a user rather than root, but of course the final installation needs to be done as root so that files can be copied to paths not writeable by normal users.

I always forget the options I need, so for my future reference as well as anyone else who finds it useful:

o conf make_install_make_command 'sudo make'
o conf mbuild_install_build_command 'sudo ./Build'

That means that the actual installation gets run via sudo, with everything else just being done as the user you started the CPAN client as.

(Of course, these days, you could also use cpanm (cpanminus) with its –sudo option…)

Slow SSH connections – hanging at GSSAPI auth

A particular box at $work had been slow to SSH to for a while, and I finally wanted to spend the time to find out why.

Running ssh -v thatmachine showed that it was hanging whilst attempting to authenticate with GSSAPI, with the slow section looking like:

debug1: SSH2_MSG_SERVICE_REQUEST sent
debug1: SSH2_MSG_SERVICE_ACCEPT received
debug1: Authentications that can continue: publickey,gssapi-with-mic,password
debug1: Next authentication method: gssapi-with-mic
debug1: Unspecified GSS failure.  Minor code may provide more information
Credentials cache file '/tmp/krb5cc_1000' not found
debug1: Unspecified GSS failure.  Minor code may provide more information
Credentials cache file '/tmp/krb5cc_1000' not found
debug1: Unspecified GSS failure.  Minor code may provide more information
debug1: Next authentication method: publickey
debug1: Offering public key: /home/davidp/.ssh/id_rsa
# authentication by public key then proceeded quickly

SSHing to the machine by IP instead, i.e. ssh -v 10.1.1.192, produced slightly different output:

debug1: Authentications that can continue: publickey,gssapi-with-mic,password
debug1: Next authentication method: gssapi-with-mic
debug1: An invalid name was supplied
Cannot determine realm for numeric host address
debug1: An invalid name was supplied
Cannot determine realm for numeric host address
debug1: An invalid name was supplied
debug1: Next authentication method: publickey
# authentication by public key then succeeded quickly

It’s clear that it’s trying to authenticate using GSS-API (Kerberos), failing, then moving on to public key auth.

The fix is simple – disable attempts to use GSS-API by adding the following to ~/.ssh/config:

GSSAPIAuthentication no

Before adding that:

[davidp@columbia:~]$ time ssh 10.1.1.192 touch /dev/null | grep real
real	0m15.512s

After adding it:

[davidp@columbia:~]$ time ssh 10.1.1.192 touch /dev/null | grep real
real	0m0.611s

Problem solved.

Disabling wifi kill-switch on Inspiron 17R (N7010)

The wireless kill-switch (Fn+F2) on my Dell Inspiron 17R (N7010) laptop is getting on my tits, as I occasionally hi that key combination by accident when trying to use Ctrl + F2.

I can’t seem to see any way to disable this, and Google doesn’t seem to be able to find anything useful. Anyone have any ideas? There must be some way to ignore that key combination.

Running xev whilst pressing that key combination shows me:

KeyPress event, serial 33, synthetic NO, window 0x5c00001,
    root 0xb0, subw 0x0, time 39357273, (121,-345), root:(1426,350),
    state 0x0, keycode 246 (keysym 0x1008ff95, XF86WLAN), same_screen YES,
    XLookupString gives 0 bytes: 
    XmbLookupString gives 0 bytes: 
    XFilterEvent returns: False

KeyRelease event, serial 33, synthetic NO, window 0x5c00001,
    root 0xb0, subw 0x0, time 39357273, (121,-345), root:(1426,350),
    state 0x0, keycode 246 (keysym 0x1008ff95, XF86WLAN), same_screen YES,
    XLookupString gives 0 bytes: 
    XFilterEvent returns: False

So, if it’s being triggered by software, it’s keycode 246 I need to deactivate/map to something else, I believe.

However, I tried with:

xmodmap -e 'keycode 246 = NoSymbol'

… but no effect, it still kills the wireless. I’m hoping that someone might know how to do it, and/or that someone else Googling for how to do this will find this post, and perhaps share any ideas. If I figure it out, I’ll of course update this post with the solution.

UPDATE – I probably should have mentioned that this machine is running Ubuntu Linux. Also, I found that, in System > Preferences > Keyboard Shortcuts, I can assign a shortcut to the Fn+F2 key combination (the shortcut column shows 0xf6), and pressing Fn+F2 does indeed trigger that shortcut (launching a terminal window, for a test), but also still triggers the wifi killswitch. I suspect that, as well as being seen by the OS and software, it’s being directly intercepted by hardware to toggle the card?

UPDATE – to help people Googling for info on how to disable the wireless/wifi kill switch key combination / shortcut for this laptop, it’s a Dell 17R / N7010 with a Broadcom BCM4313 802.11b/g LP-PHY wireless adaptor.
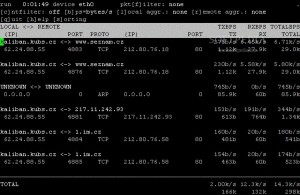
Monitoring network traffic with jnettop

Just a quick post about jnettop, a tool I find really useful for monitoring network traffic to see what other machines a machine is talking to, and how much traffic is being sent/received between them. (It also includes traffic going via the host you’re running it on, so very useful for firewall/gateway machines.)

Jnettop is a traffic visualiser, which captures traffic going through the host it is running from and displays streams sorted by bandwidth they use.

Basic screenshot:

Useful stuff.

Debian Xen kernel won’t boot until you create initrd image

I recently installed Xen on a Debian Lenny amd64 box, and found that the Xen kernel would not boot, failing to mount the root filesystem:

No filesystem could mount root, tried:
Kernel panic - not syncing: VFS: Unable to mount root fs on unknown-block(0,0)

I noticed in /boot/grub/menu.lst that the standard Debian kernel included an initrd image, whereas the Xen kernel didn’t:

# This is the Xen kernel that fails to boot:
title           Xen 3.2-1-amd64 / Debian GNU/Linux, kernel 2.6.26-2-xen-amd64
root            (hd0,0)
kernel          /boot/xen-3.2-1-amd64.gz
module          /boot/vmlinuz-2.6.26-2-xen-amd64 root=/dev/sda1 ro console=tty0

# This is the standard kernel that does boot:
title           Debian GNU/Linux, kernel 2.6.26-2-amd64
root            (hd0,0)
kernel          /boot/vmlinuz-2.6.26-2-amd64 root=/dev/sda1 ro quiet
initrd          /boot/initrd.img-2.6.26-2-amd64

To get the Xen kernel working, I needed to create an initrd image, with:

dave@devvps:/boot$ sudo update-initramfs -c -k 2.6.26-2-xen-amd64
update-initramfs: Generating /boot/initrd.img-2.6.26-2-xen-amd64

Then update the Xen kernel’s entry in /boot/grub/menu.lst appropriately:

title           Xen 3.2-1-amd64 / Debian GNU/Linux, kernel 2.6.26-2-xen-amd64
root            (hd0,0)
kernel          /boot/xen-3.2-1-amd64.gz
module          /boot/vmlinuz-2.6.26-2-xen-amd64 root=/dev/sda1 ro console=tty0
module          /boot/initrd.img-2.6.26-2-xen-amd64

Upon rebooting, the Xen kernel boots succesfully, and Xen appears to be working:

dave@devvps:~$ sudo xm list
Name                                        ID   Mem VCPUs      State   Time(s)
Domain-0                                     0 24106     8     r-----     22.4

So, if you’ve installed a Xen kernel on Debian, remember to create an initrd image. I’m fairly surprised that this doesn’t happen automatically when the kernel is installed, actually.

Resizing ext2/3 filesystem in loop file

Quick post, mostly for my own future reference, as I couldn’t quite remember how to resize an ext3 filesystem contained in a file.

dd if=/dev/zero of=disk.img bs=1M count=1024 oflag=append conv=notrunc
e2fsck -f disk.img
resize2fs disk.img

The above will append 1GB to the end of the file, then resize the ext2/3 filesystem to take up that newly-added space.

OpenDNS vs Google – speed comparison

I read a Twitter post earlier mentioning Google’s public DNS service, and suggesting that it could displace the popular OpenDNS

I thought it would be interesting to do a performance comparison between Google and OpenDNS, to see how they compare. I also decided to include the nameservers of my ISP, Virgin Media, to illustrate whether there are performance gains to be had by changing to OpenDNS (which I primarily use, along with others) or Google, or whether staying with defaults works. Continue reading OpenDNS vs Google – speed comparison

SSH key for Subversion but nothing else

I needed to create an account with an SSH key which could be used for Subversion, but nothing else.

The solution – forced commands with the SSH key – on the host machine, make ~/.ssh/authorized_keys look like:


command="/usr/bin/svnserve -t",from=""

Dumping this here mostly for my future reference, and for anyone who might find it useful.

This means the SSH private key on the client can be used by Subversion to check code in/out, but cannot be used for anything else (as SSH’ing to the host machine with that key simply starts ‘svnserve’, regardless of what the client asked for).

Mounting a Linux software RAID partition directly

I needed to mount a Linux software RAID partition directly to copy the data from it; it wasn’t being recognised as a RAID device (it didn’t appear in /proc/mdstat, only my newly-created array did), and attempting to mount it gave me:

[davidp@supernova:~]$ sudo mount /dev/sdc4 /mnt/tmp
mount: unknown filesystem type 'mdraid'

To get round that, I had to tell mount the filesystem type that was actually in use:

sudo mount -t xfs -o ro /dev/sdc4 /mnt/tmp

(I mounted it read-only just in case this approach wasn’t going to work; I don’t want to write to it anyway.)

Might be useful for anyone Googling (it’s pretty obvious, but it made me think for a few minutes… it’s getting late!)

The partition type appeared as ‘Linux raid autodetect’:

Disk /dev/sdc: 200.0 GB, 200049647616 bytes
255 heads, 63 sectors/track, 24321 cylinders
Units = cylinders of 16065 * 512 = 8225280 bytes
Disk identifier: 0x7bf29ced

   Device Boot      Start         End      Blocks   Id  System
/dev/sdc1   *           1         871     6996276   fd  Linux raid autodetect
/dev/sdc2             872         995      996030   fd  Linux raid autodetect
/dev/sdc3             996        1119      996030   82  Linux swap / Solaris
/dev/sdc4            1120       24321   186370065   fd  Linux raid autodetect