Category Archives: Linux

Monitoring network traffic with jnettop

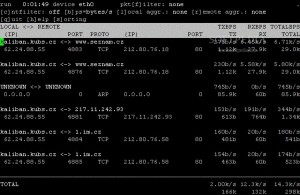
Just a quick post about jnettop, a tool I find really useful for monitoring network traffic to see what other machines a machine is talking to, and how much traffic is being sent/received between them. (It also includes traffic going via the host you’re running it on, so very useful for firewall/gateway machines.)

Jnettop is a traffic visualiser, which captures traffic going through the host it is running from and displays streams sorted by bandwidth they use.

Basic screenshot:

Useful stuff.

Debian Xen kernel won’t boot until you create initrd image

I recently installed Xen on a Debian Lenny amd64 box, and found that the Xen kernel would not boot, failing to mount the root filesystem:

No filesystem could mount root, tried:
Kernel panic - not syncing: VFS: Unable to mount root fs on unknown-block(0,0)

I noticed in /boot/grub/menu.lst that the standard Debian kernel included an initrd image, whereas the Xen kernel didn’t:

# This is the Xen kernel that fails to boot:
title           Xen 3.2-1-amd64 / Debian GNU/Linux, kernel 2.6.26-2-xen-amd64
root            (hd0,0)
kernel          /boot/xen-3.2-1-amd64.gz
module          /boot/vmlinuz-2.6.26-2-xen-amd64 root=/dev/sda1 ro console=tty0

# This is the standard kernel that does boot:
title           Debian GNU/Linux, kernel 2.6.26-2-amd64
root            (hd0,0)
kernel          /boot/vmlinuz-2.6.26-2-amd64 root=/dev/sda1 ro quiet
initrd          /boot/initrd.img-2.6.26-2-amd64

To get the Xen kernel working, I needed to create an initrd image, with:

dave@devvps:/boot$ sudo update-initramfs -c -k 2.6.26-2-xen-amd64
update-initramfs: Generating /boot/initrd.img-2.6.26-2-xen-amd64

Then update the Xen kernel’s entry in /boot/grub/menu.lst appropriately:

title           Xen 3.2-1-amd64 / Debian GNU/Linux, kernel 2.6.26-2-xen-amd64
root            (hd0,0)
kernel          /boot/xen-3.2-1-amd64.gz
module          /boot/vmlinuz-2.6.26-2-xen-amd64 root=/dev/sda1 ro console=tty0
module          /boot/initrd.img-2.6.26-2-xen-amd64

Upon rebooting, the Xen kernel boots succesfully, and Xen appears to be working:

dave@devvps:~$ sudo xm list
Name                                        ID   Mem VCPUs      State   Time(s)
Domain-0                                     0 24106     8     r-----     22.4

So, if you’ve installed a Xen kernel on Debian, remember to create an initrd image. I’m fairly surprised that this doesn’t happen automatically when the kernel is installed, actually.

Resizing ext2/3 filesystem in loop file

Quick post, mostly for my own future reference, as I couldn’t quite remember how to resize an ext3 filesystem contained in a file.

dd if=/dev/zero of=disk.img bs=1M count=1024 oflag=append conv=notrunc
e2fsck -f disk.img
resize2fs disk.img

The above will append 1GB to the end of the file, then resize the ext2/3 filesystem to take up that newly-added space.

Custom Bash completions for lazy bastards

At $work, we have a log server, where the current day’s logs from a given machine are stored in, e.g. /logs/machinename/year/month/day/. In a moment of yak shaving, I added a function to my .profile, named cdmachinelogs to allow me to type e.g. cdmachinelogs somemachine, and end up in the appropriate directory.

Now, Bash will automatically tab-complete e.g. “cdm” into cdmachinelogs, but I wanted to be extra-lazy and tab-complete the machine name, too.

Enter the following snippet:


complete -W "$(find /log/path -maxdepth 1 -mindepth 1 -type d -printf '%f ')" cdmachinelogs

So, it sets up tab-completion for the cdmachinelogs command, using a list of words obtained by finding each directory name under the path to the logs.

Posted mostly for my own later reference, but also for anyone who might find it useful.

SSH and rsync on Lacie Ethernet Disk Mini v2

Lacie Ethernet Disk Mini v2

A couple of months back, I acquired a Lacie Ethernet Disk Mini v2 for backups – I’m planning to give it to a friend to plug in, so I’ll have a little self-contained box to back up to.

The drive is a pretty stylish-looking and very solid-feeling device.

However, it comes with rather limited software – a rather poor and ugly web interface (even worse when you see the code behind it), and it supports Samba (SMB/CIFS) shares, FTP, some kind of Apple file sharing protocol, and uPnP media streaming.

Ignoring all that though, what I want is the ability to back up to it by rsync – something it doesn’t support, out of the box. However, it’s an ARM-powered unit running Linux underneath, so with a little trickery, you can make it much more functional.

There are several guides on uncrippling it to get SSH access to make proper use of it – I followed this one.

Basically, the process consists of opening up the device, and temporarily hooking up the hard drive directly to your computer in order to add a telnet binary and a backdoor to the web interface. I used a little USB to SATA/IDE adaptor I bought from eBuyer, meaning I could hook it up happily to my laptop, and didn’t have to remove the drive from the Lacie unit, simply removing the outer case and unplugging the cables from the drive and plugging in the ones from the USB unit.

See the guide linked to above for the full process, but you basically drop in a shell script which you can call via its web interface once it’s back up to execute whatever you want. The webserver on it runs at root (ugh) so it can start whatever you want it to. Typically, you’ll start utelnetd so that you can then telnet to it, download some ARM packages to install OpenSSH, rsync and other bits, get SSH working, then disable telnet, the horrible web interface, and anything else you don’t plan to use (I disabled proftpd, Samba, and the uPnP media sharing software).

Once it’s all done, you have a small but usable Linux system you can SSH to:

lacienas1

Naturally it’s not super-fast, but it does the job well enough!

A few tech specs, for anyone interested:

davidp@EDmini davidp $ cat /proc/cpuinfo 
Processor	: ARM926EJ-Sid(wb) rev 0 (v5l)
BogoMIPS	: 266.24
Features	: swp half thumb fastmult 
CPU implementer	: 0x41
CPU architecture: 5TEJ
CPU variant	: 0x0
CPU part	: 0x926
CPU revision	: 0
Cache type	: write-back
Cache clean	: cp15 c7 ops
Cache lockdown	: format C
Cache format	: Harvard
I size		: 32768
I assoc		: 1
I line length	: 32
I sets		: 1024
D size		: 32768
D assoc		: 1
D line length	: 32
D sets		: 1024

Hardware	: MV-88fxx81
Revision	: 0000
Serial		: 0000000000000000
davidp@EDmini davidp $ cat /proc/meminfo 
MemTotal:        61632 kB
MemFree:          1380 kB
Buffers:           188 kB
Cached:          28924 kB
SwapCached:          0 kB
Active:          17336 kB
Inactive:        23328 kB
HighTotal:           0 kB
HighFree:            0 kB
LowTotal:        61632 kB
LowFree:          1380 kB
SwapTotal:      128448 kB
SwapFree:       128448 kB
Dirty:            3472 kB
Writeback:           0 kB
Mapped:          14548 kB
Slab:            16688 kB
CommitLimit:    159264 kB
Committed_AS:    56104 kB
PageTables:        508 kB
VmallocTotal:   450560 kB
VmallocUsed:       716 kB
VmallocChunk:   449844 kB
SSH key for Subversion but nothing else

I needed to create an account with an SSH key which could be used for Subversion, but nothing else.

The solution – forced commands with the SSH key – on the host machine, make ~/.ssh/authorized_keys look like:


command="/usr/bin/svnserve -t",from=""

Dumping this here mostly for my future reference, and for anyone who might find it useful.

This means the SSH private key on the client can be used by Subversion to check code in/out, but cannot be used for anything else (as SSH’ing to the host machine with that key simply starts ‘svnserve’, regardless of what the client asked for).

Mounting a Linux software RAID partition directly

I needed to mount a Linux software RAID partition directly to copy the data from it; it wasn’t being recognised as a RAID device (it didn’t appear in /proc/mdstat, only my newly-created array did), and attempting to mount it gave me:

[davidp@supernova:~]$ sudo mount /dev/sdc4 /mnt/tmp
mount: unknown filesystem type 'mdraid'

To get round that, I had to tell mount the filesystem type that was actually in use:

sudo mount -t xfs -o ro /dev/sdc4 /mnt/tmp

(I mounted it read-only just in case this approach wasn’t going to work; I don’t want to write to it anyway.)

Might be useful for anyone Googling (it’s pretty obvious, but it made me think for a few minutes… it’s getting late!)

The partition type appeared as ‘Linux raid autodetect’:

Disk /dev/sdc: 200.0 GB, 200049647616 bytes
255 heads, 63 sectors/track, 24321 cylinders
Units = cylinders of 16065 * 512 = 8225280 bytes
Disk identifier: 0x7bf29ced

   Device Boot      Start         End      Blocks   Id  System
/dev/sdc1   *           1         871     6996276   fd  Linux raid autodetect
/dev/sdc2             872         995      996030   fd  Linux raid autodetect
/dev/sdc3             996        1119      996030   82  Linux swap / Solaris
/dev/sdc4            1120       24321   186370065   fd  Linux raid autodetect

Synaptics touchpad under Xorg lives again

I have a Dell Inspiron 1501 laptop running Arch Linux, and recently, after an update, the Synaptics touchpad stopped working.

The touchpad shows up in dmesg as:

Synaptics Touchpad, model: 1, fw: 6.3, id: 0x180b1, caps: 0xa04713/0x200000
input: SynPS/2 Synaptics TouchPad as /class/input/input7

I was using a USB mouse until I found time to get the touchpad working again. Here’s what I had to do…

Continue reading Synaptics touchpad under Xorg lives again

Preventing SSH brute-force attacks with iptables

I wanted to do this tonight and couldn’t remember the exact iptables incantation, and I know I’ll want it again, so sharing it here for me and for anyone else it may be useful to.

If you need SSH to be world-accessible, but don’t want to be plagued by SSH brute-force login attempts, the following ought to do the trick:


iptables -A INPUT -p tcp --dport 22 -m state --state NEW -m limit --limit 3/minute -j ACCEPT

That will allow inbound SSH connections, but only 3 per minute (averaged) – this should be more than a user would normally need, but isn’t sufficient for a brute-force login attack. If someone tries a brute-force attack against you, after a few connections they’ll be ignored.

This is assuming that your default INPUT policy is to drop or reject packets, as it should be. For it to work, it also assumes that you have a rule to allow inbound connections which are part of an established connection – something like:


iptables -A INPUT -m state --state ESTABLISHED,RELATED -j ACCEPT

Of course, if you’re going to open SSH to the world, even with the above protection, you’ll still want to ensure passwords are secure (or disable password-based authentication totally, using SSH keys instead), and I’d recommend disabling root logins via SSH (the PermitRootLogin setting in /etc/ssh/sshd_config)